Queues in Case Management: Part 2

We have understood queues and creation of queues and routing rules in previous post. Now let us see the usage of the same in this post

All new records matching to the mentioned criteria in routing rule, will be routed to the queue and for existing records we can route those manually by selecting Apply Routing rule button as shown in below snippet. One the item is routed to queue, a new queue item is created which is a separate record than the actual case or activity entity record.

We can see the queue items by opening the queues and selecting the queue as shown i below snippet.

We can also chose from different views to see the records.

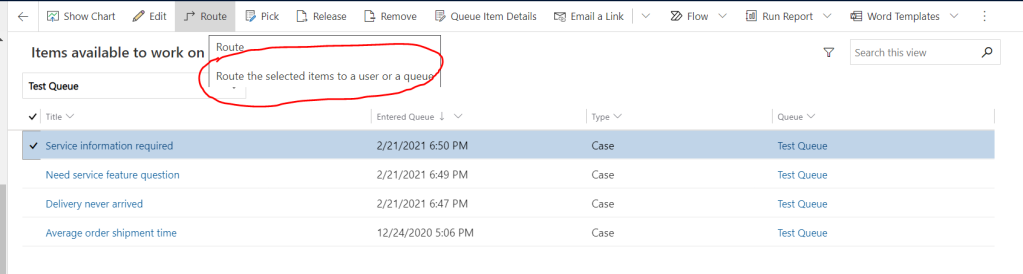
There are different actions we can take on the queue items such as Route, Pick, Release , Remove and Queue item details etc

Even though the item is already routed to this queue, it can be still rerouted to another user or queue by using Route option. Just to note, once its re routed, it will be removed from this queue as one item can belong to only one queue at the time.

If the user wants to work on the queue item, he or she can select the item and click on Pick. The queue item will be assigned to that user and same user name will be displayed under Worked By field.

Once the work in done or he or she is not able to work on that queue item, it can be released to queue again. Just to note here, once the item is released back to queue, the owner of the item will be rolled back to the current queue owner and not the earlier owner of the record also the “worked by” field which was set to the user when the item was picked will be set to blank again

The queue item can be removed from the queue by Remove option.

To view the details of the queue item, we can use Queue item details

Queue item details will show the name of the associated queue. Worked by if its been worked by someone, and dates of the item entered in the queue and modified on.

Hope this helps to understand basics of Queues and Routing rules. I would still recommend to play with these entities and practically understand how it works.

Queues in Case Management: Part 1

Customer service management may require different type of attentions and monitoring depending on parameters such as the different types of customer, priority, different products or services, different subscription levels (regular, premium customers), various activity categories, different geography etc.

Defining Queues is helpful to organize, monitor and prioritize the work by having a centralized list of pending work that needs attention and sorting tasks by type or by the people assigned to complete them

A queue is created by default for each and every user in D365 customer service, we can define additional queues based on our requirements as mentioned above. Let us define a queue and check further details. we have to define paramers for the queue

  • Name: Name of the queue
  • Type – Private or Public : Private queue is having access to limited members and we have to add the members to it. Where as public queues are accessible at organization level
  • Incoming email address : All the messages sent to queue are send to this email Id
  • We can select which emails can be converted to activities

Once we create the queue, the mailbox is auto created.

Few important things to be noted for queue based on my experience

  • Queues are not included in solution, hence deployment can not be done with solution deployment. We did recreate the queues manually. There might be better ways to do it, I am yet to check
  • Once the queue is enabled for any entity, it can not be disabled
  • The items added to the queue are called as Queue items
  • Any queue item, which is actually a record , can be added to only one at any point of time
  • When two agents simultaneously add cases to the queue, then the system creates two queue items instead of a single queue item
  • If we have created workflows or used custom API to assign cases to agents and if a same case is assigned to two agents at the same time, then the system creates two queue items instead of a single queue item
  • From a queue, when an agent picks a case created by another agent and releases it, then the case gets assigned to the queue owner and not the agent who created the case
  • If we have to delete any queue, it must be removed from routing rules and shall contain no queue items, otherwise queue can not be deleted
  • When user releases or picks up the queue item, there is option to remove the item in queue or retain. By default it is retained. If we chose Yes to remove, the item will be removed from the queue
  • Actual entity record and queue item are different, when we remove any item from queue, record will not be deleted

Creating queues in below easy steps

Go to Settings- Service Management- Queues

Enter all the details based on the requirement as explained above, with various options.

Once the queue is saved and Queue items are associated with th
Queue Type is one of the important attribute
which emails should be converted to activities is defined based on this attribute

Once the queue is created, we can define the rule(s) to auto assign the items to the queue as shown below

In the rule we can define the filter criteria, which is similar to advanced find to match the records and if the record matches that criteria, it would be routed to the selected queue or user or team. Here we are discussing about queue, hence queue created in above step is selected

We have seen how to create queues and routing rules in this post Let us see continue to understand how to use the queues and how the routing rules work in next post