Dataverse Long Term Data Retention (Preview) – Part 3

In previous post , we have seen how to create retention policies and view run history of the retention polices. In this post let us see how to view the retained data and limitations of the data retention feature

View Retained Data

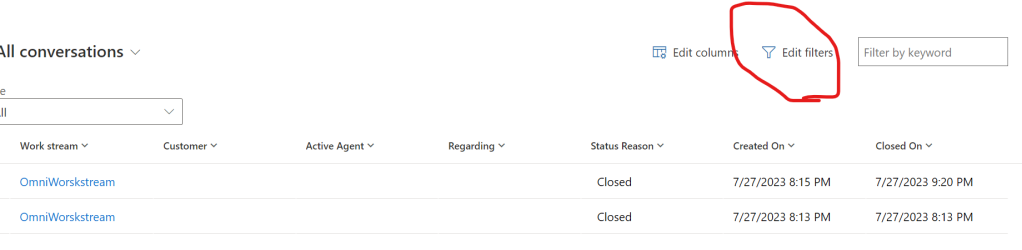
Now lets us see how to access these retained records in Dynamics. We can go to any view and click on edit filter.

In the Edit filters we can see “Change to retained data”. By selecting this we can see the retained data

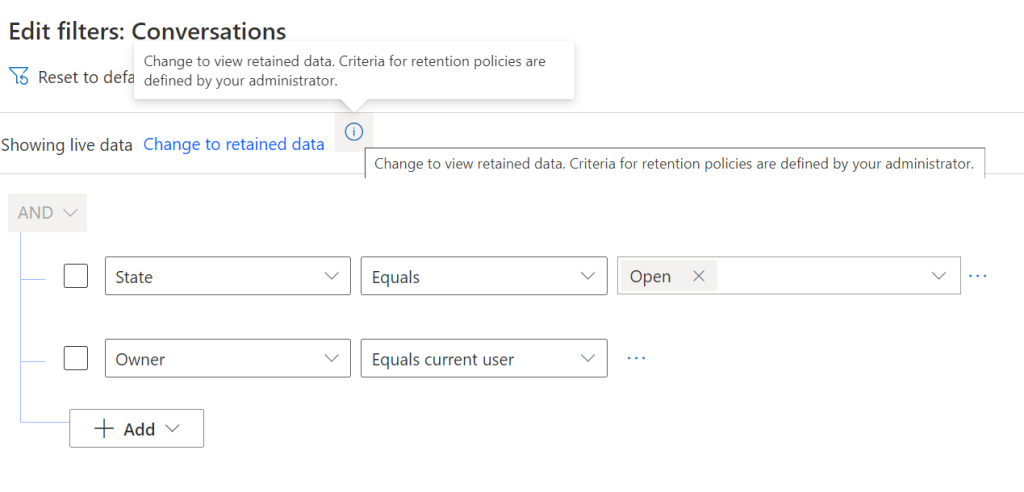
After we select this, it will prompt for confirmation and lets click Change to retained data

It will automatically flip the option to “Change to Live data” in case we want to see live data

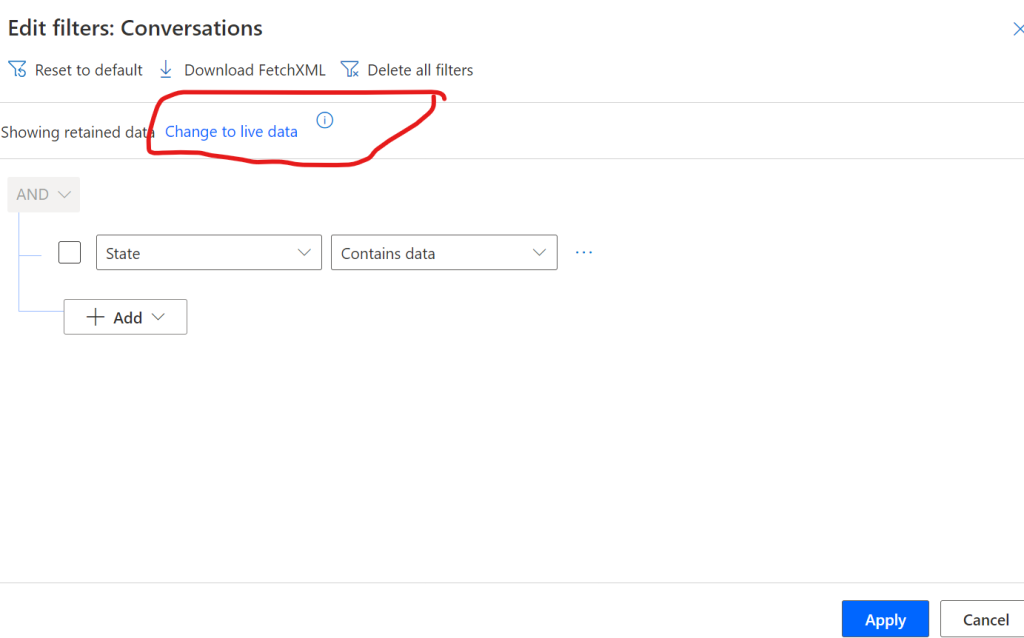
If we observe , we can see “*” in front of the view stating that its showing retained data

Note- Once the data is successfully moved to  data lake, this data is purged from the Dataverse data base. This can not moved back to the database 

Limitations for retrieval of retained data

This restrictions are enforced by Dataverse for each environment:

  • Up to five users can query and retrieve retained data at the same time.
  • Up to 30 queries per day are allowed for each environment.
  • Any single request from advanced find, Power Automate cloud flow, or Dataverse OData public API is considered as one query.
  • Queries are allowed on one table at a time. Joins and aggregation functions aren’t allowed.
  • Retained data includes lookup data. Lookup values in the table are denormalized with ID and name value.

Once we have established the retention policies now we need to review the impact on capacity reports. Lets us see how this is demonstrated in the capacity report

Capacity Reports

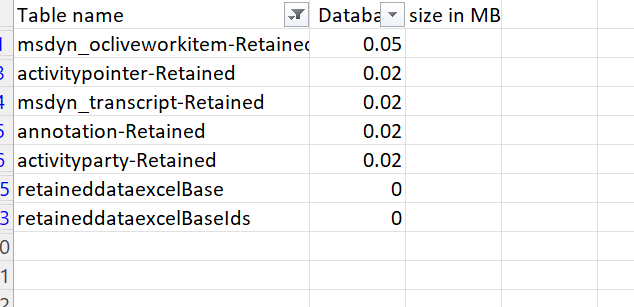
When we look at the capacity report after establishing the retention policy, at the moment retained data is also shown in the capacity reports, however for the retained data the tables are shown separately. If these tables don’t top in the storage use, we may download the list of tables and there we can find the tables with suffix of -Retained and their consumption.

We can filter the table names with Retained Suffix

We can see the table capacity usage.

Note - At the moment Microsoft has not provided any bifurcation on how they would charge for database storage vs Datalake storage and this is preview, hence this million dollar question is still unanswered. 
Also for each query to fetch the records for data retention, API requests available in our plan will be counted for these calls
One good thing is these retention policies are solution aware, so unlike bulk deletion jobs, we do not have to recreate these in all environments separately. 

Apart from looking for the archival solution, we also had to look at the reasons for such exponential increase in the data size post PVA + Omnichannel implementation. I will share few findings in my next blog post.

Dataverse Long Term Data Retention (Preview) – Part 2

In Previous post we understood what is Long term data retention and how to select the data which is to be retained. In this post let us see how to create retention policies and how to view run history of these policies

Creating Data retention Rules

Once we are clear on what is to be retained. let us create retention policies. In Make.Powerapps.com, in the environment, select More.

Click on Discover all button to see all options. If you have already pinned the feature, then it would be readily available in the left navigation pane

Scroll down till end and we can see Retention policies, Click on that and also pin it for future access

It will show a list of retention policies if we have already created. Then we can click on “New retention policy” to create a new retention policy

Select the table for which we are creating the retention policy. Here for each root table we need to create a separate retention policy. Tables which have the Enable long term retention feature enabled would only appear in the dropdown. The corresponding child table records would be applied the same policy automatically. Let us also give meaningful name to the retention policy.

In the criteria , we have to select the view which will be used to filter the records for retention.

Set the schedule start date

Finally select the schedule to decide the frequency to run the retention policy

Once the retention policy is saved, we can it in the list of retention policies

View Run History of Retention Policy

We can check the history of the retention policy explaining the status of number of runs

Below snippet shows that the selected retention policy is run once

If we click on this history, we can see more details. We have created the policy only on conversations table, however same has been applied to its child tables.

Note - Once the retention policy is created,  it takes 72-96 hours irrespective of the data volume. Data retention policies are given a low priority by the platform. Dataverse will always run the retention process in the background to avoid any impact on other platform services, such as apps and flows.

Note - When we create the retention policy and schedule it, we can see the progress of the execution with the help of the status of the retention policy. Referring below statuses we can also understand how it works

Scheduled - The policy has been scheduled to run.
In progress - Retention	The process of moving and changing the data state from active to non-active (retained) for the rows in the parent root table and all child tables.
Pending Reconciliation- Waiting to reconcile the retained rows in Dataverse managed data lake.
In progress Reconciliation - During this stage, ensures no data loss by reconciling the retained rows with the original rows before delete from active.
Pending Delete - Waiting to delete all retained rows.
In progress Delete -Delete of retained rows from applications.
Succeeded - Retention process completed successfully.
Failed-The retention process failed.

Hence we have to wait for few days to see the results and history run.

Let us see how to view the retained data and what are the limitations of viewing retained data and understand how capacity reports work post applying data retention policy in my next post